- 作者:鱼八(网易1902期)
- 公众号:鱼八说
- 日期:2019-06-23
- 类型:Android
- 说明:本文源于 鱼八 原创,如需转载请带上链接或注明出处!
一、测量performMeasure
在这个方法中我们我们需要清楚2件事。
- 1 . 测量 view的宽高流程是什么?
- 2 . MeasureSpec 是什么?
最后我们再去看看DecorView测量的整个流程是什么样的。
1.测量 view的宽高流程
最开始我们先去了解测量一个View的过程,我们进入到 ViewRootlmpl类中,找到
performMeasure()方法
private void performMeasure(int childWidthMeasureSpec, int childHeightMeasureSpec) { |
从源码中可以看到,mView 直接就调用了
measure()方法,我们点进去可以看到我们进入到了View类中的Measure()方法,是final类型不可以被重写。继续阅读源码,在measure()方法中,调用了onMeasure()方法
public final void measure(int widthMeasureSpec, int heightMeasureSpec) { |
进入到
onMeasure()方法中
protected void onMeasure(int widthMeasureSpec, int heightMeasureSpec) { |
发现调用了setMeasuredDimension()方法,进入该方法中我们发现又调用了setMeasuredDimensionRaw()方法,在进入到该方法中,发现这个方法里只是对
mMeasuredWidth和mMeasuredHeight进行了赋值,并且进行了一个标志位的设置,表示对这2个值已经做了赋值。
private void setMeasuredDimensionRaw(int measuredWidth, int measuredHeight) { |
所以一个 view 从performMeasuer—> measure() —> onMeasure —> setMeasuredDimension( ) — > setMeasuredDimensionRaw 的过程实际上最后获得是View的宽高。
2.了解 MeasureSpec (View类的静态内部类)
我们知道了测量的流程后,我们再去了解一下
MeasureSpec。MeasureSpec封装了父布局传递给子布局的布局要求,有两个部分,一个是View的模式还有一个是View的尺寸,这两个部分被封装到了MeasureSpec中,MeasureSpec是一个 32位的int值。
32位值 :00000000 00000000 00000000 00000000 ,他的前2位就是view的模式 SpecMode。后30位就是代表着尺寸SpecSize。
在 进入到MeasureSpec中,我们可以看到 定义了三个值:UNSPECIFIED ,EXACTLY(精确模式) ,AT_MOST (最大模式)
public static class MeasureSpec { |
阅读源码,我们发现:
- 1 . public static final int UNSPECIFIED = 0 << MODE_SHIFT; 00000000 00000000 00000000 00000000
表示 父容器 不对 View做任何限制,系统内部使用- 2 . public static final int EXACTLY = 1 << MODE_SHIFT; 01000000 00000000 00000000 00000000 精确模式
表示父容器检测出View的大小,View的最终大小就是 SpecSize , 这个模式对应的布局属性是:LayoutPamras.match_parent 或者是 固定大小- 3 . public static final int AT_MOST = 2 << MODE_SHIFT; 10000000 00000000 00000000 00000000 最大模式
表示父容器会指定一个可用大小,View的大小不能超过这个值,对应的布局属性是:LayoutPamras.wrap_content
接着继续往下看MeasureSpec这个类,我们主要关心以下几个方法:
- 1 .
makeMeasureSpec
我们会看到makeMeasureSpec这个方法,这个方法主要是将一个SpecMode值和SpecSize值进行一个打包的操作,打包成MeasureSpec。因为sUseBrokenMakeMeasureSpec 为false,所以我们只要关心else里的代码return (size & ~MODE_MASK) | (mode & MODE_MASK);
makeMeasureSpec方法 这个return表达意思是取MODE_MASK后30位做size,前2位做mode,然后打包返回得到一个MeasureSpec 这样的一个32位int值
public static int makeMeasureSpec(@IntRange(from = 0, to = (1 << MeasureSpec.MODE_SHIFT) - 1) int size,@MeasureSpecMode int mode) { |
- 2 .
getMode()和getSize()
接着往下看 可以看到两个方法 getMode()和 getSize(),这2个方法表示传入一个MeasureSpec,将MeasureSpec进行一个解包操作,得到它的SpecMode和SpecSize.
@MeasureSpecMode |
我们现在知道了view的测量过程和测量规格MeasureSpec
接着我们回到源码去看看DecorView(顶层view)测量的过程。
3.DecorView的测量获取 MeasureSpec 的规则
首先我们知道DecorView开始绘制UI是从
performTraversals()方法开始的,它先调用了performMeasure()方法:
// Ask host how big it wants to be |
我们看到了这个方法的childWidthMeasureSpec ,childHeightMeasureSpec这两个参数
现在我们需要知道这两个参数是如何得到的,这这个方法的上面我们发现是由以下两句话获得的:
int childWidthMeasureSpec = getRootMeasureSpec(mWidth, lp.width); |
我们看到的getRootMeasureSpec()这个方法,它的第一个参数表示窗口的宽,第二参数表示顶层view布局属性的宽。我们进入到
getRootMeasureSpec()该方法中,
private static int getRootMeasureSpec(int windowSize, int rootDimension) { |
阅读源码发现根据顶层View的不同布局属性,会进入不同的条件中。通过这个方法可以知道顶层View测量的方式经过一定的规则。也就是View的测量过程中 DecorView(顶层View) 的MeasureSpec 是由窗口的大小和自身的LayoutParams所决定的,遵守如下
规则:
- 1 .如果DecorView的LayoutParams是:LayoutParams.MATCH_PARENT。那么我们给DecorView设置的MeasureSpec的值,他的模式是精确模式,它的尺寸是窗口大小。
- 2 . 如果DecorView的LayoutParams是LayoutParams.WARP_CONTENT。那么我们给DecorView设置的MeasureSpec的值,他的模式是最大模式,它的最大尺寸是窗口大小
- 3 . 如果DecorView的LayoutParams给的是固定大小,那么我们给DecorView设置的MeasureSpec的值,他的模式是精确模式它的尺寸是LayoutParams的大小。
4.DecorView 测量过程
1.获取DecorView 的 MeasureSpec
我们之前已经知道了窗口宽度和layoutParams,再通过
getRootMeasureSpec()方法得到了 DecorView 的实际的 MeasureSpec。也就是说从顶层View开始绘制,会先通过一定的规则获取到它的MeasureSpec,再去往下走,
我们接着往下看,会发现performMeasure()中调用的mView.Measure()方法(这里的mView实际上就是顶层的DecorView)。因为measure()是被final修饰的无法被重写,进入到Measure()方法中,在这个方法里,我们主要去看它实现的onMeasure(widthMeasureSpec, heightMeasureSpec);方法。值得注意的是,根据源码注释我们要知道这个onMeasure方法是可以且必须被他的子View进行重写的。我们都知道DecorView是继承自FrameLayout的,
* The actual measurement work of a view is performed in |
2.进入onMeasure()方法遍历测量子控件
所以在这里我们现在要去看看FrameLayout的
onMeasure()方法。
@Override |
一开始我们会看到一个遍历子View的一个for循环,这个for循环遍历了每一个子View ,调用了
measureChildWithMargins(),进入到这个方法中:
protected void measureChildWithMargins(View child, |
measureChildWithMargins()实际上是在测量子view。
在这个方法中我们需要关注getChildMeasureSpec()这个方法,它是获取到子View的MeasureSpec的一个方法。
这个方法的三个参数: spec 是指父控件的MeasureSpec ,padding 是指 当前父容器已经使用的空间,childDimension 是指子控件的布局参数对应的尺寸。
现在让我们进入到这个方法中去看看:
public static int getChildMeasureSpec(int spec, int padding, int childDimension) { |
这段源码是获取view的MeasureSpec的规则:
首先我们要知道获取view的MeasureSpec和顶级View的MeasureSpec是不一样的。
View的MeasureSpec的获取是由父容器MeasureSpec和自身的LayoutParams决定的。
而我们前面也提到了顶层的View也就是DecorView 的MeasureSpec 是由窗口的大小和自身的LayoutParams所决定的。规则:

现在通过阅读源码我们知道这个方法实际上是子控件获取MeasureSpec 的一个规则,最后一行
return MeasureSpec.makeMeasureSpec(resultSize, resultMode);表明了这个方法 返回值是MeasureSpec 。
通过这个规则子View获取到它的MeasureSpec ,然后让我们在回到measureChildWithMargins()方法中,继续往下看。
我们会看到执行了child.measure()在measure()方法中又会去到view类中的onMeasure()方法,紧接着在这个方法中又会去调用setMeasuredDimension()然后通过setMeasuredDimensionRaw()去得到子view的宽高。注:在子view中不需要再去测量直接就通过onMeasure中的一系列方法获得自身的宽高。在我们测量子View的过程中,onMeasure()方法里有这样一个方法:
setMeasuredDimension(getDefaultSize(getSuggestedMinimumWidth(), widthMeasureSpec), |
我们需要注意这个方法的参数中
getDefaultSize()方法。
public static int getDefaultSize(int size, int measureSpec) { |
这个方法中我们看到通过
getMode和getSize获得measureSpec的mode和size值,在通过specMode的值进入到不同的case中。通过源码我们可以知道,我们在view的测量过程中,无论它是什么模式,他的测量尺寸specSize都是测量规格中的specSize 。
如果我们在自定义View的过程里,不去重写我们的onMeasure()方法,那么在布局文件中写wrap_content和match_content的效果是一样的。所以我们在定义view的时候,一定要去重写onMeasure()方法。
3.梳理decorView的测量流程
1 . 测量结束
最后我们在回到for循环。当循环遍历执行结束后,至此我们对子View的全部测量就结束了。往下走,我们会看到
setMeasuredDimension()这个方法,这个方法是用来决定父容器的自身的宽高,而它自身的宽高是由我们的父容器的子控件所决定的。 当他内部的所有方法执行完毕后,到此我们DecorView的 measure就全部结束了。2 . 梳理测量流程
现在我们来回顾一下整个流程,
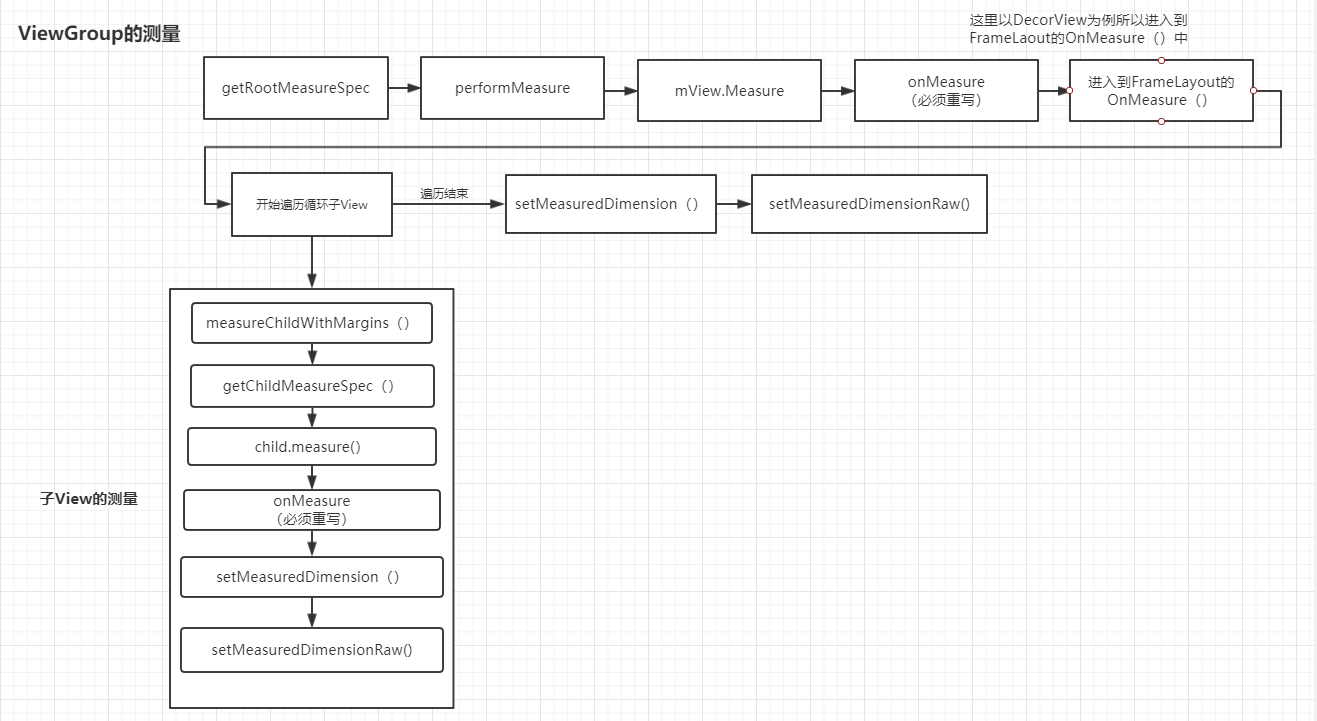
首先有一点我们要明白:DecorView是继承自FrameLayout,而FrameLayout是一个ViewGroup。也就是说对DecorView的测量实际上就是对ViewGroup的测量。我们要知道ViewGroup的测量和View的测量是有区别的。然后我们再来看流程 首先我们要知道测量一个view之前我们需要知道它的测量规格,而对于顶层View也就是DecorView来说,他的测量规格是通过
getRootMeasureSpec(mWidth, lp.width);所获得的,它是获得MeasureSpec的规则。第一个参数代表着窗口的宽,第二个参数是顶层view布局属性的宽(高同理)。再进入到
performMeasure()中, 我们看到mView.measure(childWidthMeasureSpec, childHeightMeasureSpec);这里的mView实际上就是我们的DecorView,进入到measure()方法中因为它被final修饰所以无法被重写,接着往下看可以看到
onMeasure(widthMeasureSpec, heightMeasureSpec);方法的调用。值得注意的是,这个onMeasure方法是可以且必须被子View重写的,所以我们去到DecorView的onMeasure()方法中,然后发现它最终调用了父类也就是FrameLayout的onMeasure()方法。在这个onMeasure()方法中我们看到for循环对子view进行了遍历测量,而子view测量的流程是:先通过measureChildWithMargins()中的getChildMeasureSpec()获取到子view的MeasureSpec,再通过child.measure(childWidthMeasureSpec, childHeightMeasureSpec);方法传入获取到的宽高的MeasureSpec。最后经过以下方法:
childe.measure()---> onMeasure--->setMeasuredDimension()---->setMeasuredDimensionRaw()后方法直接获取到子view自身的宽和高。当子view遍历循环结束后。在后面会调用setMeasuredDimension()---->setMeasuredDimensionRaw()方法去获取DecorView自身的宽高,而它自身的宽高是由它内部的子View所决定的。至此我们整个DecorView的测量也就全部完成了。
从以上我们也可以得出顶层view对子view的测量实际上做的是一个递归操作。
5.总结
对于ViewGroup的测量会先调用
measure(),然后去调用onMeasure()方法,在重写的onMeasure()方法中,我们需要去通过measureChildWithMargins()方法测量子控件宽高,在测量子view宽高之前我们又要先通过getChildMeasureSpec()方法获得子控件的测量规格MeasureSpec,这个测量规格遵循一定的规则。在调用子控件的measure()方法,最后完成了子控件的测量。接着ViewGroup 会调用setMeasuredDimension()然后通过setMeasuredDimensionRaw()方法保存自己的宽高。
对于view的测量 当我们在对子控件进行测量的时候,它会有个
child.measure()方法被调用,他会来到view的measure()方法,在measure()方法中又会去到onMeasure()方法,在这个方法中又会去调用setMeasuredDimension()然后通过setMeasuredDimensionRaw()去得到子控件的宽高。注:在子控件中不需要再去测量直接就通过onMeasure中的一系列方法获得自身的宽高。
所以我们得到结论,如果在自定义ViewGroup 时,我们先要调用onMeasure方法去测量子控件的宽高,再去调用setMeasuredDimension()去确定自身的宽高。而在自定义view的时候。我们需要去重写onMeasure()方法去重新确定view的宽高,否则布局文件中写wrap_content和match_content的效果是一样的。
view的测量流程
二、布局performLayout
1.laout布局
了解完了view的测量,我们在来看看view的布局方式,首先我们需要在viewRootImpl类中的performTraversals中找到
performLayout(lp, mWidth, mHeight);方法,这个方法的第一个参数是指顶层布局的布局属性,后面两个参数是顶层布局的宽和高。然后我们进入到()方法中,我们看到 mView赋值给了host,那么这个host就是我们的顶层view。我们往下看可以看到host.layout(0, 0, host.getMeasuredWidth(), host.getMeasuredHeight());传入的是测量的宽和高。
private void performLayout(WindowManager.LayoutParams lp, int desiredWindowWidth, |
之后我们在进入到layout()方法中
public void layout(int l, int t, int r, int b) { |
这个方法实际上是通过
setFrame()方法确定我们上下左右的值。接着我们往下看可以看到 这里也调用了一个 onLayout(changed, l, t, r, b); 进入到这个方法中,我们发现它一个空方法,供子类实现。如果我们是ViewGroup,我们需要在onLayout里对子view进行摆放。如果是view,那么就不必重写这个方法。
我们这里以FrameLayout为例,我们进入到FrameLayout的onLayout()方法中:它会先调用一个layoutChildren()这个方法,这个方法就是去遍历我们的子view,对子view的控件摆放,然后又会去执行child.layout()方法 形成了递归的操作。
2.总结
view的布局实际上是调用view.layout确定自身的位置,即用在
layout()方法中的setFrame()方法确定mLeft,mTop,mRight和mBottom的值。确定位置之后,会执行onLayout()方法,如果此时是ViewGroup那么需要调用onLayout来确定子view的位置(通过递归的方式确定子view的位置),如果是view就不需要。
三、绘制performDraw
1.draw布局
最后我们在去看view的绘制,同样的我们需要在viewRootImpl类中的performTraversals中找到
performDraw();,我们进入到中,
private void performDraw() { |
我们看到了一个draw()方法,
private void draw(boolean fullRedrawNeeded) { |
在进入到其中我们可以看到
drawSoftWare()方法, 然后我们在这个drawSoftWare()可以看到一个关键方法mView.draw(canvas);,
private boolean drawSoftware(Surface surface, AttachInfo attachInfo, int xoff, int yoff, |
这里就会开始我们DecorView的绘制,通过它的注释我们可以看到绘制的步骤: 1. 绘制背景 2. 绘制图层保存 3. 绘制内容 4. 绘制子View 5.绘制边缘恢复图层 6.绘制装饰
public void draw(Canvas canvas) { |
如果是绘制view,我们需要重写view的onDraw方法,如果自定义的是viewGroup ,那么我们还需要去绘制子view,这个时候我们进入到viewGroup的
dispatchDraw()方法中,我们可以看到viewGroup里面实现了dispatchDraw()方法。 在这个方法中同样是有一个for循环去遍历我们的子view,执行了drawChild()方法去绘制我们的子view。实际上drawChild()方法内部就是child.draw()方法,这里也是一个绘制的递归操作。
2.总结
ViewGroup的绘制流程
可以总结以下几点:
绘制流程的六个步骤:
1、对View的背景进行绘制 drawBackground(canvas)
2、保存当前的图层信息(可跳过)
3、绘制View的内容 onDraw(canvas)
4、对View的子View进行绘制(如果有子View) dispatchDraw(canvas)
5、绘制View的褪色的边缘,类似于阴影效果(可跳过)
6、绘制View的装饰(例如:滚动条)
其中第2步和第5步是可以跳过的。
那么view 的绘制流程 就是
- 1 . 绘制背景 drawBackground(canvas)
- 2 . 绘制自己 onDraw(canvas)
- 3 . 绘制前景,滚动条等装饰 onDrawForeground(canvas)
四、View的绘制流程总结
在自定义开发中,我们需要去实现onMeasure()—> onLayout() — onDraw()
如果我们自定义的是ViewGroup方法onMeasure()—> onLayout () — onDraw()
如果是自定义view的方法 onLayout方法不用 去实现,而onDraw()方法可选。

